ForexRobotNation.com – Best Forex Robot & Expert Advisor Reviews Forex Robot, Expert Advisor
 The Supply & Demand trading approach isn’t complicated or secret. It’s a powerful, time-tested method that works across forex, crypto, commodities, indices, and more. In this article, I’ll break down exactly how I use supply and demand in my trading, why it works, and how you can apply it using my complete scalping strategy.
First, let’s start with the video breakdown:
Contents
What is Supply and Demand in Trading?
Supply and demand trading is based on identifying areas where price has moved aggressively in one direction. These aggressive moves, often marked by large candles and imbalances, create high-probability trading zones where price is likely to react again.
This is the exact concept I use to send the best Forex signals in the market in 2025.

When price pushes up strongly, it leaves behind a demand zone (buying interest). When price drops sharply, it creates a supply zone (selling interest).
These zones act as magnets for future price action, allowing traders to enter at premium levels with tight stop losses and high reward potential.
Why Supply and Demand Works (The Institutional Footprint)
Supply and demand works because of institutional trading behavior:
- Institutional Order Blocks: Large banks and hedge funds move the markets. Their massive orders often can’t be filled at once, so they leave “footprints” in the form of big impulsive candles and fair value gaps. When price returns to these areas, it triggers remaining institutional orders and continues in the same direction.

- Liquidity and Stop Hunts: Retail traders often chase price moves late, buying after a surge or selling after a drop. Institutions push price back into zones to collect liquidity and stop out retail traders before resuming the main trend.
By recognizing these footprints, we can trade with Smart Money, not against it.
How to Draw Supply and Demand Zones
Drawing accurate zones is critical. Follow these rules:
- Identify Impulsive Moves: Look for strong moves (3+ large candles) in one direction with fair value gaps.
- Mark the Origin Candle: For a demand zone, mark the last red candle before a strong push up. For a supply zone, mark the last green candle before a sharp drop.
- Use Fresh Zones: Focus on untouched zones where price hasn’t revisited yet.
- Align With Trend: In uptrends, trade demand zones (buys). In downtrends, trade supply zones (sells).
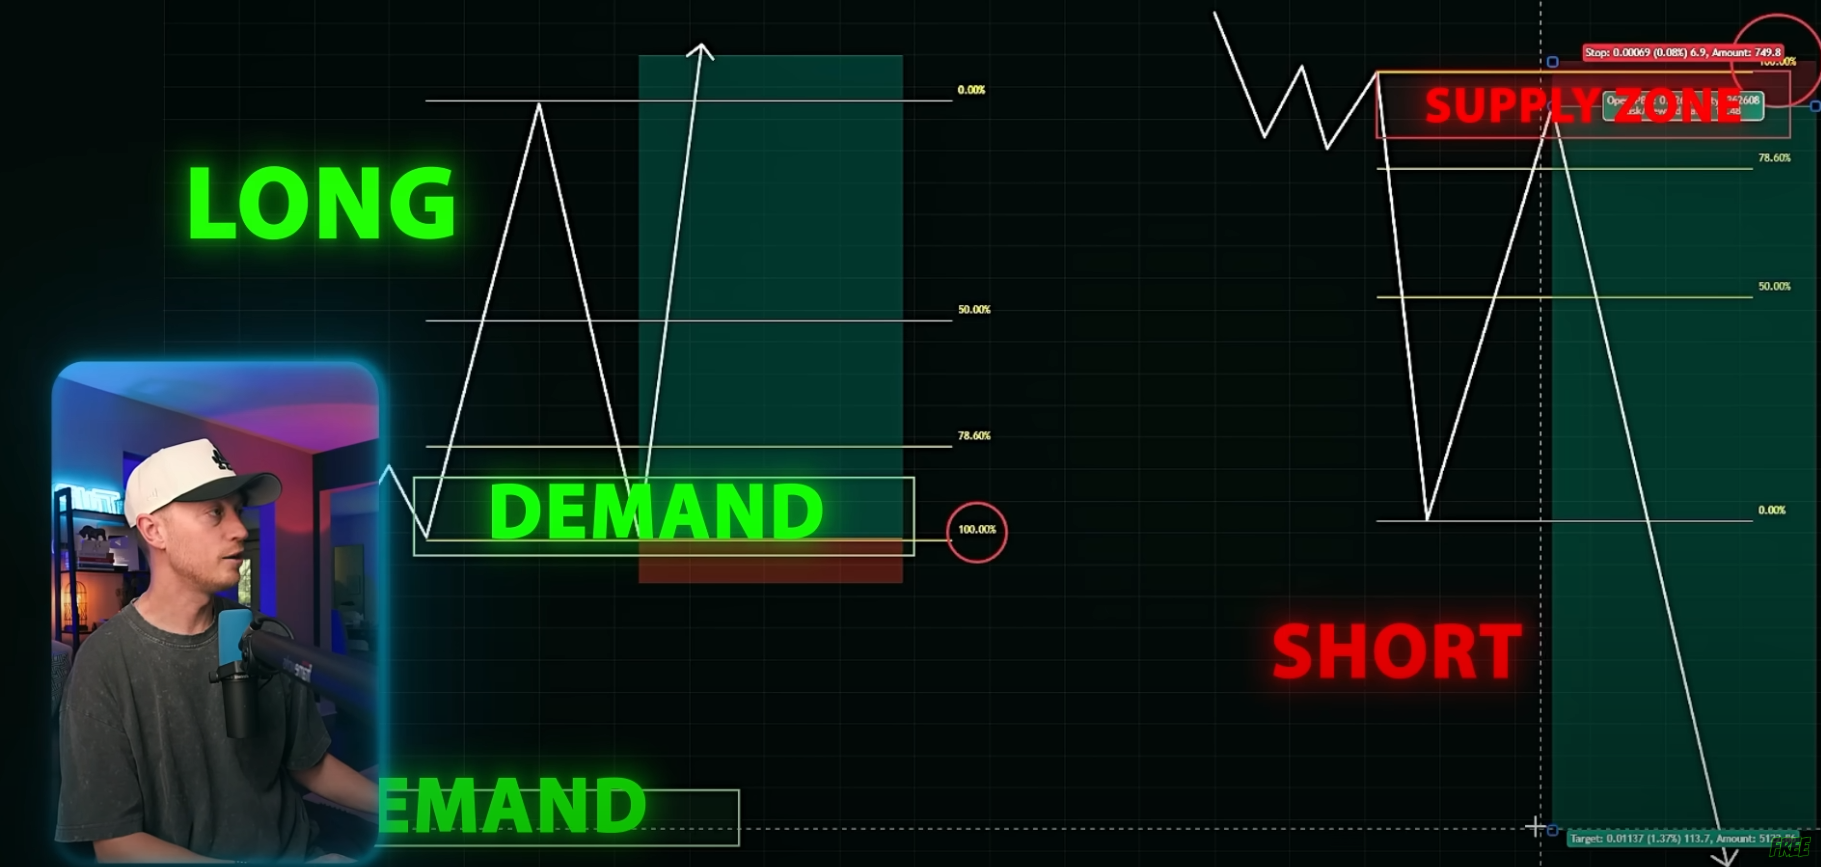
Pro Tip: Combine zones with Fibonacci retracements. Price often retraces 100% back to the zone before continuing in the trend direction.
Real Trade Examples (Live on Stream)
Here’s how I used this in a live trade:
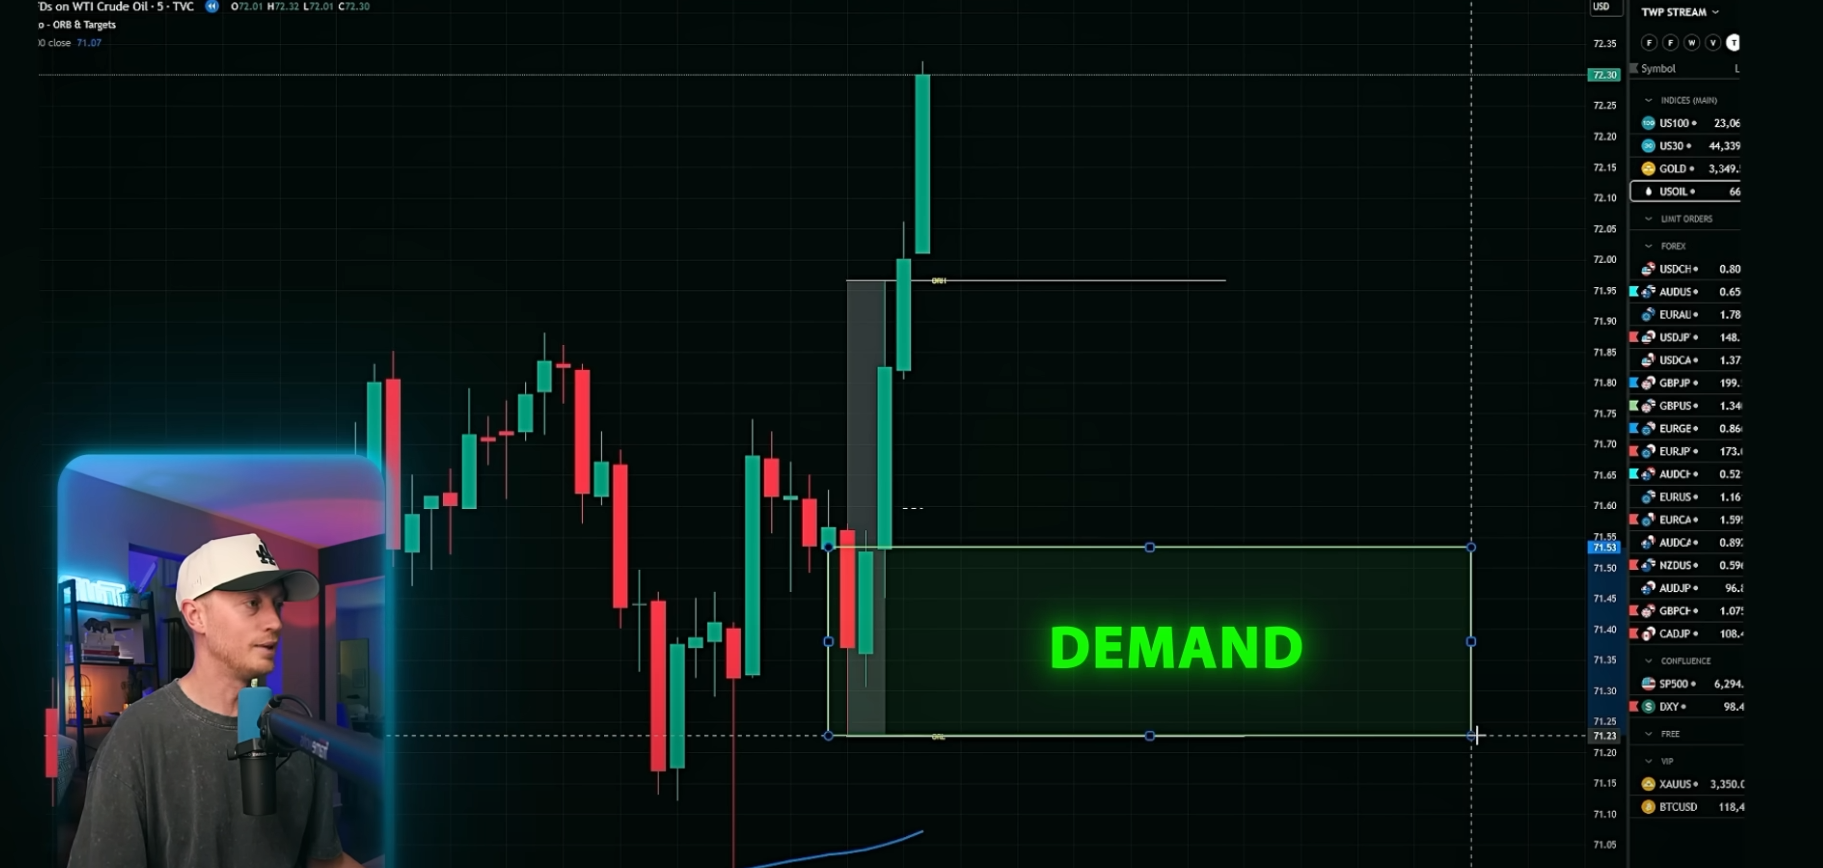
- Step 1: Price surged upward with three big green candles.
- Step 2: I marked the last red candle before the push as my demand zone.
- Step 3: Price retraced perfectly back into the zone, wicked without closing below, and I entered.
- Step 4: Within minutes, price surged back up and hit my take profit live in front of thousands.

The same worked on a sell trade: price formed five strong red candles, creating a supply zone. It retraced into the zone, reacted perfectly, and dropped to target.
3 Qualities of Powerful Zones
The best supply and demand zones share these traits:
- Impulsive: Strong moves with big candles and clear imbalance.
- Fresh: Untested zones are far more reliable.
- Close to Breakouts: The nearer a zone is to a breakout point, the stronger the reaction.

For example, one trade showed four red candles breaking a trendline, forming a fresh supply zone. Price quickly retraced, tapped the zone, and collapsed, hitting target cleanly.
The Full Supply and Demand Scalping Strategy
Here’s my step-by-step scalping strategy:
- Chart Setup:
- Timeframe: 5-minute (M5)
- Time zone: UTC-4 (New York)
- Add Indicators:
- Add Opening Range Breakouts (set to 9:30–9:45 NY time).
- Wait for Range Break:
- After the first 15 minutes, price will break either above or below the range high/low.
- Draw Your Zone:
- If price breaks upward, mark the last red candle before the breakout (demand).
- If price breaks downward, mark the last green candle before the drop (supply).
- Enter on Retrace:
- Wait for price to retrace into the zone.
- Place stop loss below demand (for buys) or above supply (for sells).
- Set take profit at recent highs/lows.
- Execute and Manage Risk:
- Stick to tight stops and clear targets for strong R:R trades.
Why This Works Across All Markets
I use this strategy daily on Forex, Gold, Bitcoin, US30, NASDAQ, and Oil, all live on stream. Price behavior is universal because it’s driven by institutional flow, not individual retail traders.
I also use the strategy in my trading robots, like Forex Fury to get sharper entries.
Final Thoughts
Supply and demand is one of the most powerful and universal trading strategies you can learn. It allows you to trade in sync with institutions, avoid retail traps, and enter at high-probability levels.
✅ Focus on clear impulsive moves
✅ Trade fresh, untouched zones
✅ Combine zones with opening range breakouts
I use this exact method live every day, and you can too. Watch my live streams, check out my “One Strategy for Life” video, and if you want hands-on guidance, consider joining my VIP trading room where I send signals daily.
📌 Ready to Take Your Trading to the Next Level?
If you found this guide helpful, smash the like button, subscribe, and drop a comment below. Join my VIP room for daily trades or catch my next live stream to see these strategies in real time and if you want to trade GOLD, check out last weeks video on gold trading strategies.